Sketchup pro 2021 21.0.339 repack на русском
Содержание:
- Creating your own materials
- Touring the Extension Warehouse interface
- LayOut
- Replacing all component instances with another component
- Editing a component with the Solid tools
- What you need to know about components
- Аналоги Google SketchUp
- Plugin: Component Sprayer Update 1.3
- Главная страница
- Selecting a template
- Replacing one material with another
- Uninstalling or removing extensions
Creating your own materials
The materials included in SketchUp help you start using materials and explore how they work. To apply materials specific to your own design or building, you probably need to create your own materials. The process is pretty easy: Start with an image to create a texture tile and then specify a color if needed.
Windows
To create a new material from your own files or color codes, follow these steps:
- In the Materials panel, click the Create Material icon () in the upper right.
- In the Create Material dialog box that opens, type a name for the new material in the text field at the top.
- Choose the color, texture, and opacity options for your new material. The options work just like those in the Edit panel. Refer to the earlier section, , for details. Or, for help understanding the color options, see Mixing Colors in the Color Picker.
- Click OK. Your new material appears selected in the In Model collection.
MacOS
To create a new material that’s a texture, follow these steps:
- In the Colors panel, click the Textures Palette tab (the one with the brick icon).
- Select the collection where you want the new material to appear.
- Select Color > New Texture.
- In the dialog box that appears, select an image file for your texture.
- In the panel that appears, type a name for the texture, set the width and height for the tile size, and click OK. If you want to colorize the texture, follow the steps in the earlier section, .
And here’s how to save a specific color as a material:
- Use any of the color tabs to create your desired color, which appears in the color swatch at the bottom of the Colors panel. See Mixing Colors in the Color Picker for details.
- Select the Textures Palette tab (also known as the brick icon).
- Navigate to the collection where you want to save the color.
- Drag the color swatch from the bottom of the Colors panel into the collection’s swatches area.
Tip: You can also expand your materials collections by downloading materials. Check out this post from the SketchUpdate blog for details.
- Colors browser
- Materials browser
- Paint Bucket tool
- SketchUp
- video
Touring the Extension Warehouse interface
The Extension Warehouse interface gives you a few simple and handy ways to find, install, and manage extensions. This section highlights the main features and has links to articles that explain how these features work in more detail.
Extension Warehouse home page
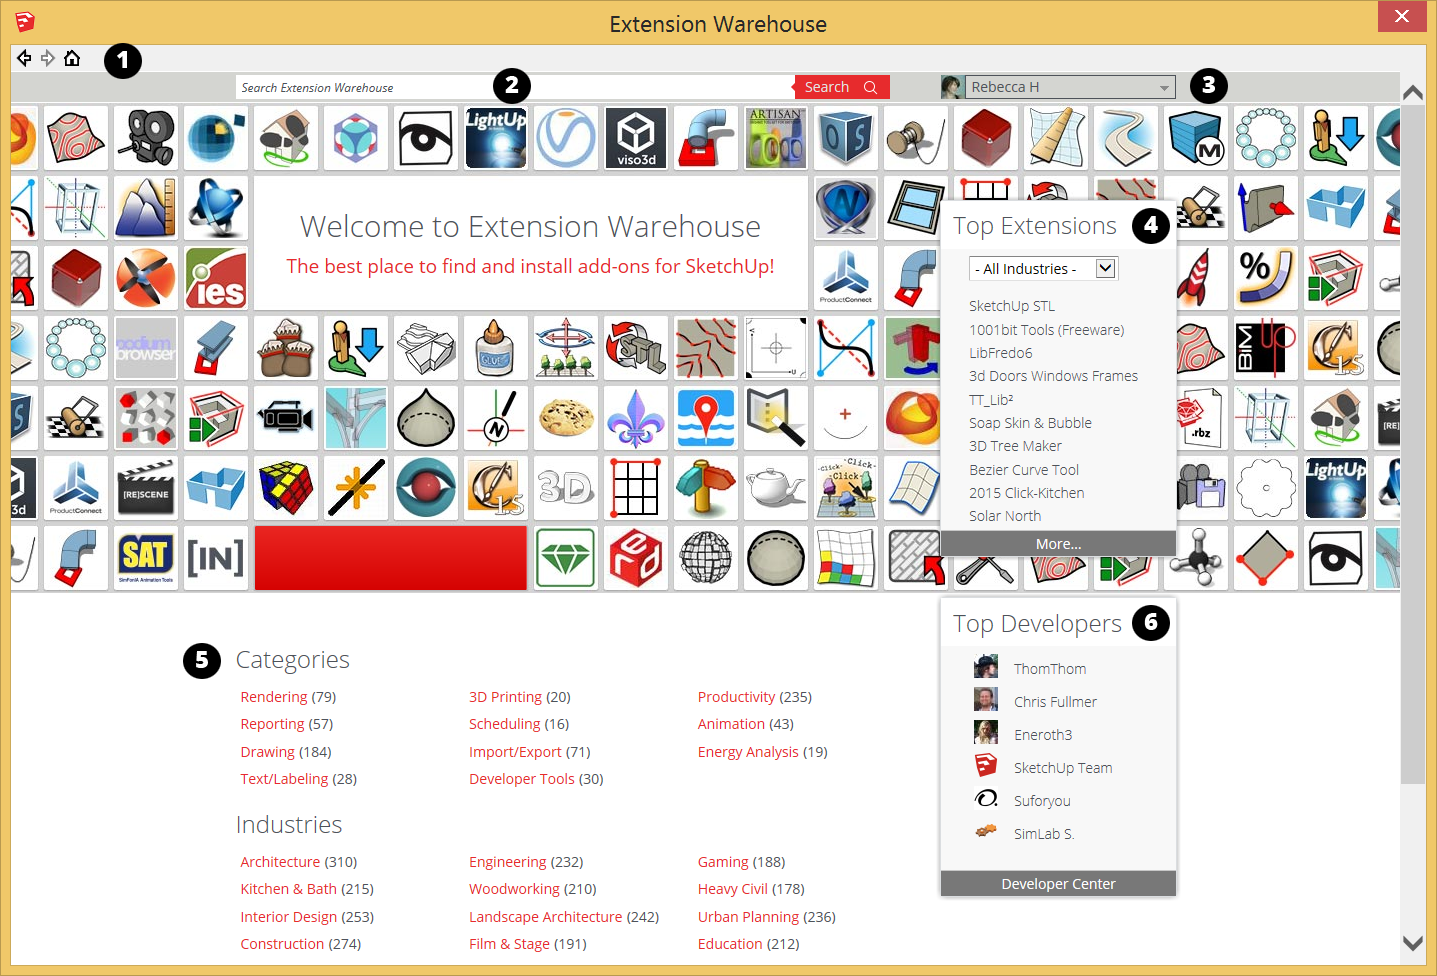
When you first sign in to the Extension Warehouse, you see the home page, as shown in the following figure. To help you connect the features to what you see on-screen, the numbers in the following list correspond to the figure callouts.
- Back, Forward, and Home icons: You see these icons wherever you are in the Extension Warehouse.
- Search box: Type an extension’s name (if you know it) or search terms that describe the functionality or features you’re looking for.
- User menu: From this menu, you can go to the My Extensions page, the Developer Center, or the My Account page. The menu also enables you to sign out of the Extension Warehouse.
- Top Extensions: This list highlights the most popular extensions. Click an extension’s name to see the extension details page and learn more about the extension.
- Categories and Industries: Extensions are tagged with categories and industries to help you find the extension you need. This area of the Extension Warehouse home page lists all the category and industry tags.
- Top Developers: Check out what the top developers for the Extension Warehouse are up to by clicking a developer’s user name in the Top Developers list.
To find the extension you’re looking for, you can use the Search box or browse the Categories and Industries. Searching or Browsing for Extensions explains your options as well as how the refine your search results.
Extension details page
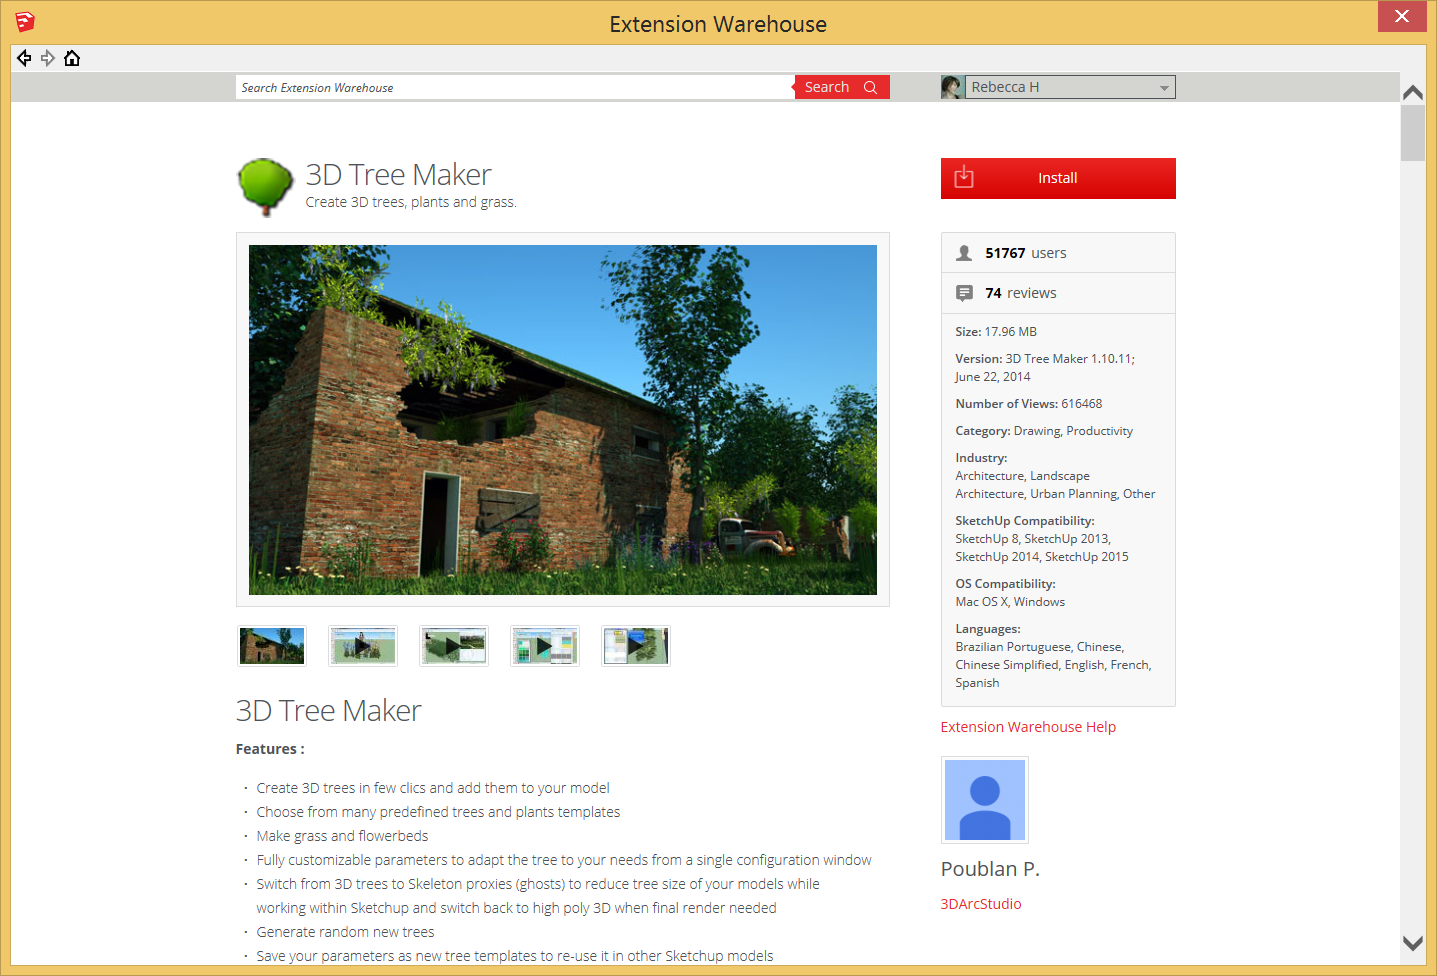
You install an extension from the extension details page, such as the one for the 3D Tree Maker extension shown in the following figure. Adding Extensions to SketchUp explains the ins and outs of installing extensions. In addition to the preview images (and sometimes a video), each extension details page typically has the following:
- Description: Here the developer explains what the extension does and how it’s useful. You might also find information about updates or fixes.
- Reviews: Scroll down below the description, and you can read reviews from other users who have downloaded the extension.
- Install button: When you find the extension you’re looking for, click this button to install the extension.
- Sidebar of statistics and info: At a glance, you can see basic info about the extension, such as the file size, date created, SketchUp and operating system compatibility, and more.
- Developer: Below the sidebar is the developer’s name and a link to their profile.
- Report Abuse link: If you suspect an extension violates the Extension Warehouse Terms of Use, click the Report Abuse link at the bottom left of the extension details page.
My Extensions page
After you install one or more extensions, you can update, disable, uninstall, and otherwise manage your extensions from the My Extensions page. This page also helps you migrate your extensions to a new computer or version of SketchUp. See Managing Extensions for details.
My Account page
The My Account page, available via the user menu, enables you to customize your public profile or commenting, language, and other settings. Managing Your Extension Warehouse Profile and Account walks you through the options.
Tip: If you’re a developer, the My Account page also has tabs for customizing your developer info and your store, if you sell extensions. For help with developing extensions and managing your developer account, visit the Developer Center, which you access via the Extension Warehouse user menu.
LayOut
Компонент LayOut позволяет осуществлять оформление конструкторской документации на основе моделей, которые были созданы в программе SketchUp.
Сразу после запуска программа предлагает выбрать шаблон для дальнейшей работы. Для этого доступно несколько основных форматов: А3 и А4, книжная или альбомная ориентация листа.
Дополнительно можно указать тип бумаги: разлинованную (со вспомогательными линиями) или обычную, белую (в дальнейшем фон заливки можно будет изменить).
- Меню, расположенное в верхней части экрана.
- Рабочая область, расположенная по центру.
- Панели инструментов, расположенные вокруг рабочей области.
- Лоток по умолчанию, расположенный в правой части экрана.
Меню
В самой верхней части программы располагается Меню, которое позволяет получить быстрый доступ к основным функциям программы.
Оно состоит из таких пунктов, как:
- Файл. Для осуществления простейших операций с документами. Позволяет открывать, сохранять и загружать 3D модели. Здесь же, в меню «Настройки страницы» можно изменить тип и формат бумаги, изменить ориентацию листа на книжную или альбомную.
- Изменить. Для быстрого доступа к операциям для редактирования текущего документа. Включает такие операции, как отменить, вернуть, копировать, вставить. Здесь же находится меню «Параметры приложения», где можно настроить редактор изображений, текста и таблиц по умолчанию, изменить или добавить горячие клавиши для быстрого доступа к нужным компонентам программы. Выбрать настройки для запуска.
- Вид. Позволяет изменять масштаб рабочей области, активировать сетку, включать режим панорамы, использовать символы предупреждения.
- Текст. Для работы с надписями. Можно менять формат текста (курсив, полужирный, подчеркнутый, зачеркнутый). Осуществлять выравнивание, менять межстрочный интервал.
- Упорядочить. Для удобной работы со слоями. Здесь же можно включить или выключить привязку объектов к сетке.
- Инструменты. Перечень доступных для работы с файлом инструментов.
- Страницы. Позволяет удалять или добавлять страницы, перемещаться между уже созданными.
- Окно. Для управления элементами, находящимися в меню «Лоток по умолчанию», расположенном в правой части экрана.
- Справка. Для быстрого доступа к справочной информации.
Лоток по умолчанию
Панель инструментов, расположенная под «Меню» включает в себя основные для редактирования компоненты. При необходимости ее можно удалить или переместить в другое место на экране.
Лоток по умолчанию помогает быстро настраивать рабочую область, поменять цвет фона, толщину линий и другие необходимые параметры.
По умолчанию включает в себя:
- Цвета. Доступен выбор необходимого оттенка при помощи пипетки, используя схемы RGB, HSB, Оттенки серого, Изображение, Список. Здесь же можно настроить прозрачность альфа канала. Сохранить несколько цветов в палитру.
- Стиль фигуры. Можно выбрать заливку для фигуры, тип, цвет и толщину линий. Настроить стиль штриха.
- Заливка шаблоном. Для выбора доступны тональные заливки, символы материалов, геометрические плитки и шаблоны сайтов.
- Модель SketchUp. Для удобной работы с моделями, которые были созданы в программе SketchUp. Позволяет осуществлять визуализацию объектов.
- Стиль текста. Работа со шрифтами. Можно настроить выравнивание, межстрочный интервал, размер и тип шрифта.
- Страницы. Для создания и редактирования страниц, перемещения между ними.
- Слои. Для перемещения между слоями проекта. Можно настраивать их видимость, закреплять (защита от изменения) выбранные.
- Вырезки. Для более подробной визуализации документа. Включает в себя всевозможные стрелки и указатели, которые можно удобно размещать.
- Учебник. Краткая справка и помощь, касательно выбранного элемента. Информация будет меняться в зависимости от того, какой инструмент выбран.
При необходимости панель инструментов и меню Лоток по умолчанию можно закрыть. Благодаря этому можно значительно увеличить размер рабочей области. Вновь вернуть закрытые вкладки можно через пункт меню «Окно».
Replacing all component instances with another component
When you use instances of the same component throughout a model, you can easily replace all instances of a component with a completely different component. To replace one component with another, follow these steps:
- In the Components panel, click the In Model icon.
- In the area that lists all the components in your model, context-click the component you want to replace and choose Select Instances.
- Still in the Components panel, navigate to the component you want to use instead.
- Context-click the new component and select Replace Selected from the menu that appears.
Editing a component with the Solid tools
When you edit a component with the Solid tools, the steps are little different than the steps for editing components with the other drawing tools.
Tip: To start, if you want to use the Solid tools to edit a subcomponent within a component, you need to explode the main component. For example, to edit the Picket component with the Subtract tool, which is one of the Solid tools, you need to explode the Fence Panel component so that you can click the Picket component immediately after selecting the cutting object. After you’re done editing the Picket component, you can re-create the Fence Panel component.
The following steps explain how to edit a component with the Solid tools, using the fence model as an example:
- Edit the component with a Solid tool In this example, the Subtract tool cuts a hole in the Picket component. In the Entity Info panel, notice that the name of the component instance changes from Picket to Difference.
- To update the component definition so that all pickets reflect your changes, context-click the modified picket and select Make Component.
- In the Create Component dialog box, make sure the component Name Definition matches the original component name. In this example, that name is Picket.
- Click the Create button. A dialog box asks whether you want to replace the component definition.
- Click Yes. All instances of your component reflect the change you made with the Solid tool or tools.
- (Optional) If you exploded a component to access subcomponents, you can re-create the component. For example, select all the entities in the updated fence and re-create the Fence Panel component.

- component
- components
- Dynamic Components
What you need to know about components
Working in context
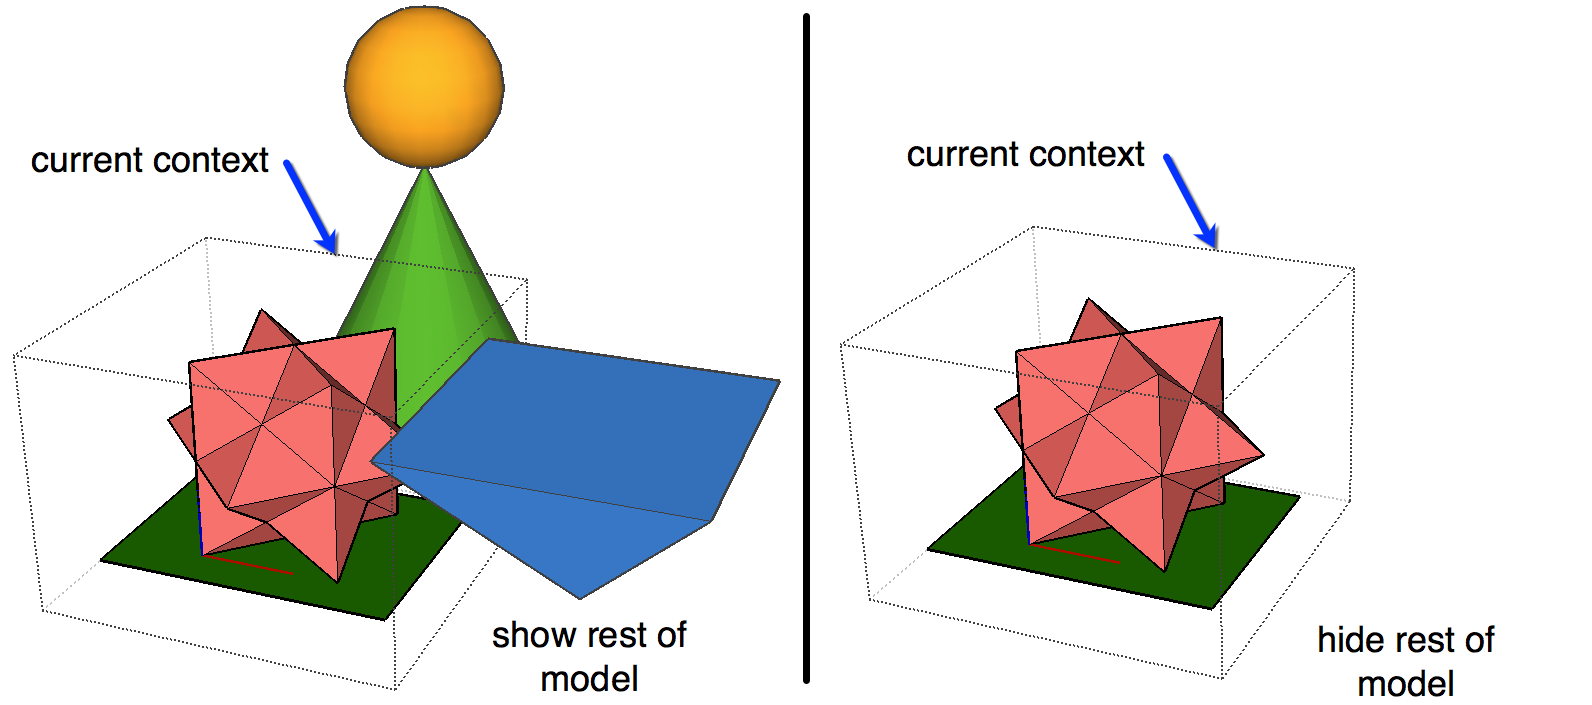
All the tools act only on entities within the current editing context. This means that the Erase tool cannot touch anything outside the current context even if you click on something unintentionally. The Select tool will not select anything outside the context, even when using a crossing window.
The drawing window can sometimes become too crowded with information during editing. View > Component Edit > Hide Rest of Model is a toggle that shows or turns off everything outside the current context. You can also toggle the visibility of similar components while component editing View > Component Edit > Hide Similar Components. Learn to use these features to become a faster, more efficient modeler.
 Component nesting and context
Components can contain other Components and Groups in addition to faces and edges. This is called nesting. Each time a Component (or Group) is included within another Component or Group, it is nested one level within the outer context.
Context means the immediate container for entities (edges, faces, groups, components, dimensions, text, etc.). A model is the largest context that SketchUp can have;it is the uppermost level of organization. When entities are selected and included in a Component, the Component becomes the context for those entities. If a Component is made from three other Components, that Component becomes the context for those three sub-entities.
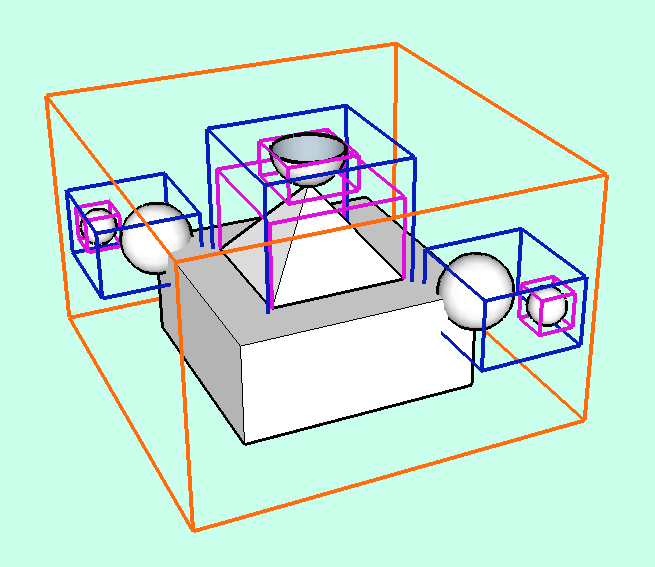
Fig. 1
In Fig. 1, the orange lines indicate the outer bounds of the main Component’s context. The blue lines indicate the first nesting level of sub-Components within the main Component. Each blue box represents the context for the items within the box. Finally the magenta lines indicate the second nesting level down of sub-Components within the first (blue) nesting level. Notice that the magenta objects are within context of each of the nested blue components.
Context editing components and nested components
Components and groups may be edited (modified) at any time by Right clicking on the object and selecting Edit from the context menu, or by double clicking the select tool on the object. To finish editing, right click in white space outside the bounding box and select Close Group or single click the select tool outside the bounding box.
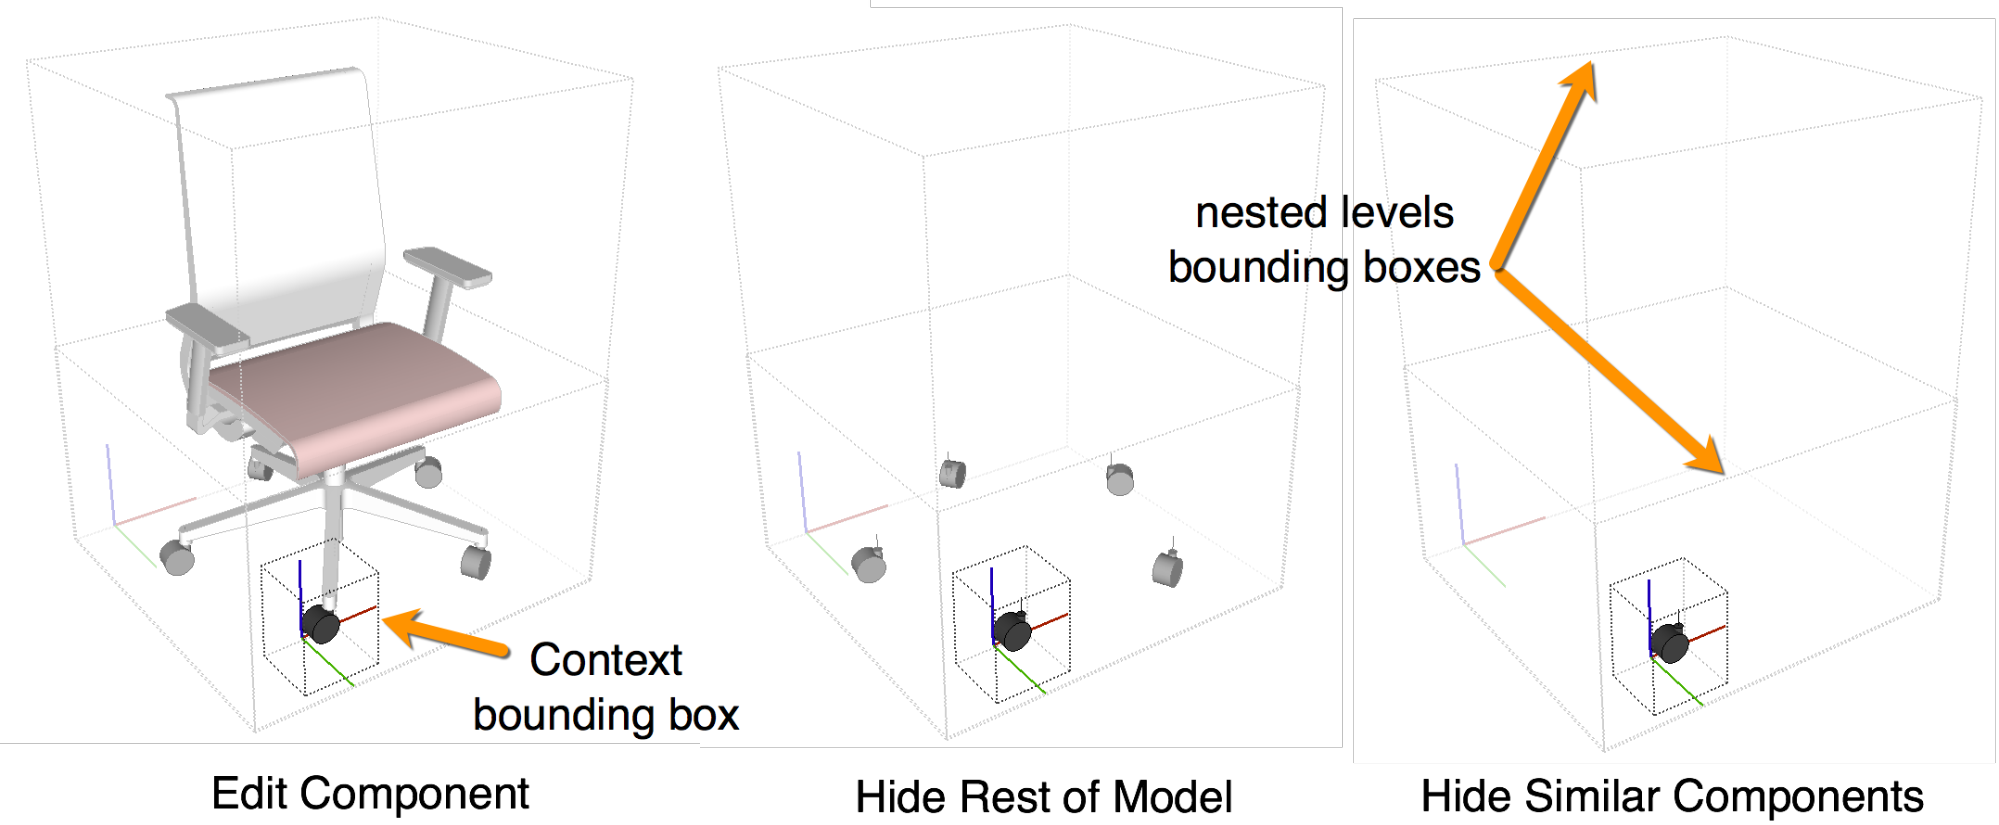
Editing a component is like working on another SketchUp model within the main model. SketchUp uses in-place component editing. This allows you to see the rest of the model in context for reference while you make changes to the component. When editing a component, the limit of the current context for the component being edited is shown by a gray bounding box. The axes directions and origin for the component are shown with a red, green, blue icon. When editing a component, the rest of the model is low lighted (dimmed). You cannot change any of the rest of the model outside of the current context, but you can infer to anything throughout the entire model.
Complexity / Level of detail in a model
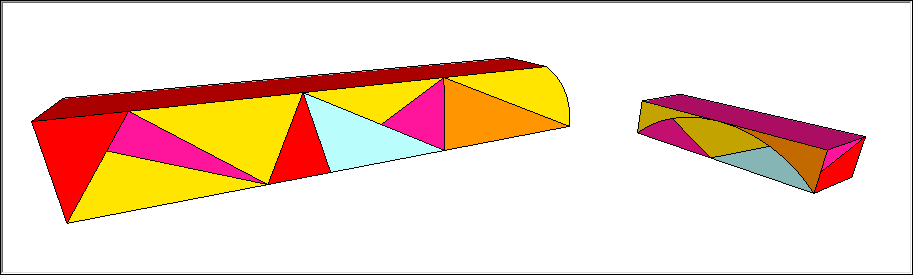
Level of detail (LOD, or Complexity of detail) has important implications for a product manufacturer. Complexity refers to the materials, nesting levels, and number of polygons used to represent geometry. See the article: Making a detailed model in a lightweight way.
Many products are modeled using engineering CAD programs to allow the models to drive the manufacturing process and machinery. To do this, a great deal of detail is required of the CAD models. When these types of models are brought directly into SketchUp, however, they can immediately bog down the performance of the designer’s model and therefore may not be a very useful product for the designer to integrate into their design.
 |
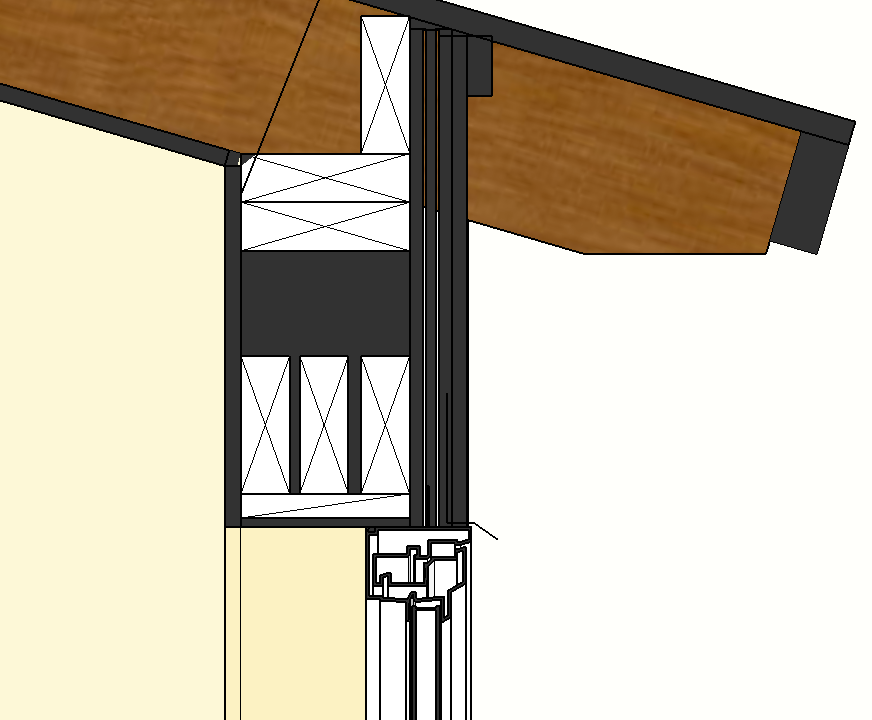 |
There may be times, however, when a designer desires a more detailed representation, especially when they are planning on using the model to create section details. This is a good opportunity for two product models of differing levels of detail to be swapped one for another using a consistent origin point.
Аналоги Google SketchUp
SketchUp считается простым редактором для работы с 3D и 2D моделями. Его функционала вполне достаточно для выполнения самых необходимых действий. Поэтому он подходит не только для любительского, но и профессионального редактирования.
Как и у любой другой программу, у SketchUp есть свои аналоги, к которым относятся такие приложения, как:
- Blender
- AutoCAD
- ArchiCAD
- K-3D
- Art of Illusion
- Zmodeler
Каждый из них имеет свои особенности и недостатки, поэтому подходит для создания предметов интерьера, моделирования игровых персонажей и их последующего внедрения или других целей. Все они имеют схожий между собой функционал и могут частично или полноценно заменить друг друга.
В отличие от них, SketchUp Pro поставляется сразу с дополнительными компонентами Style Builder и LayOut, которые позволяют осуществлять более реалистичную визуализацию созданных моделей, проектов, а также позволяют работать с документацией (чертежи).
Плагины для Google SketchUp Программа проектирования имеет много встроенных компонентов, к примеру, в ней есть библиотека, в которой имеется мебель, текстура материалов и многое другое. Но имеются и независимо компилируемые программные модули, которые динамическим образом подключаются к главной программе и предназначены для того, чтобы расширить ее возможности либо плагины.
Эти уроки очень полезны для тех, кто хочет создать у себя на дачном участке красивый дизайн или можно спроектировать интерьер дома. Рассмотрим основные плагины для программы Google SketchUp pro: V-Ray дает возможность демонстрировать 3d элементы модели; Make Faces может облегчить работу с чертежом и схемой, которые можно импортировать из AutoCAD; Pen Tool+ осуществляет работу в качестве дополнения к инструментам Перо и так далее.
Имеются также плагины, помогающие демонстрировать 3d модели, увеличивают некоторые инструменты, ими можно усовершенствовать анимации, экспортировать в определенный формат некоторые проекты. Плагины можно скачивать и free – свободно. Как применять какой-то из плагинов, можно взглянуть в онлайн-уроки.
Plugin: Component Sprayer Update 1.3
4
08
2008
 The fantastic Didier Bur (checkout his Ruby Library Depot for all his fabulous Sketchup Plugins) has announced an update to his incredibly useful, Free Sketchup Plugin, Component Sprayer.
Whats new in version 1.3
- New “shape” option to drop component at each vertex of selected faces.
- Bug fix when loading the script on Mac.
- Bux fix that froze the script when no destination layer were specified.
This Sketchup plugin is great for randomly spraying trees onto landscapes, making rows of columns, rivets, etc… or for making abstract art! Give it a try and let me know, or see how its going! 8)
Technorati Tags: , , , , , , ,
Comments : Tags: 3d design, 3d plugin, 3d rendering, free plugin, free sketchup plugin, sketchup, sketchup addon, sketchup plugin
Главная страница

Добрый день! Добро пожаловать!. Если вы проектировщик, технолог или дизайнер, используете в своей работе Skecthup, то возможно предлагаемый инструмент CoolPipe for Sketchup Interface пригодится вам в вашей коллекции.
Бесплатный инструмент CoolPipe для Sketchup предназначен для моделирования инженерных коммуникаций (трубопроводов и все что с ними связано) в среде SketchUP. Сайт предназначен для свободного распространения инструмента CoolPipe.
Лицензия использования накладывает единственное ограничение: коммерческое распространение программного обеспечения с целью прямых или косвенных продаж.
Автор открыт для общения и обсуждения основного функционала. Свои комментарии по использованию данного инструмента направлять на адрес: admin@coolpipe.ru
На сайте можно ознакомится с основными идеями и предложить свои собственные. Обсудить функционал на форуме или в любом другом месте сайта в виде комментариев. Рассмотреть «примеры работ» пользователей плагина.
Уже почти год идет разработка версии 2.0, кардинально будет изменен дизайн, будут добавлены некоторые расчеты. Проект не брошен, надеюсь на успешное завершение. На данный момент (22-04-2021) выполнено 60%. Подключайтесь к телеграм каналу, там, время от времени, публикуется информация о текущем положении.
Создал телеграм канал @CoolPipeNews
Планирую выполнить переезд сайта на другую площадку. Прошу прокомментировать как вам такое >>
Добрый день дорогие пользователи плагина coolpipe.
Приму пожертвования (от тех кто разобрался с функционалом плагина) в виде готовых библиотек компонентов, а также ваши заполненные базы данных элементов. Любой вклад сообщества в развитие плагина приветствуется.
Исправлены мелкие и не очень мелкие ошибки по указаниям пользователей.
Исправление ошибок совместимости с версиями SU 2013-2014
Добавлена дополнительная информация по спецификации (площади поверхностей стандартных элементов CoolPipe, внутренние объемы трубопроводов и фасонных изделий, подсчет количества сварных соединений). Открываться окно дополнительной информации будет отдельной кнопкой из спецификации.
Источник
Selecting a template
Every model in SketchUp is based on a template, which has predefined settings for your model’s background and units of measurement. When you begin a new model, selecting a template with the correct unit of measurement makes modeling easier.
Here’s how to select a template in the Welcome to SketchUp dialog box:
- On the Files panel, which is selected by default in the left-hand sidebar, select one of the templates shown (such as Architectural Inches or Woodworking Inches).
- (Optional) If you don’t see the template you want, select More Templates in the upper right. You see additional options, as shown in the following figure. The bold text describes the type of work for which the preset was created. The units appear below the style name. After you select a template, the modeling window appears with your selected template applied.
Tip: While you’re working in SketchUp, you can access the Welcome to SketchUp window anytime. On the menu bar, simply select Help > Welcome to SketchUp. After you become comfortable creating 3D models in SketchUp, you can create a custom template that reflects your preferences.
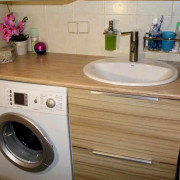
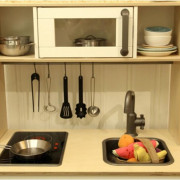
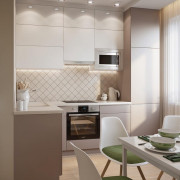
Replacing one material with another
Because SketchUp enables you to replace one material with another, you can experiment with materials quickly and easily. In a kitchen, preview different countertop materials, such as black granite, blue tile, and white composite. If you’re picking out house paint colors, compare yellow siding and dark green trim with navy siding and cream trim. When you know the keyboard modifiers, the process is a cinch. Check them out in the following table.
| To Replace One Material with Another … | Modifier Key (Microsoft Windows) | Modifier Key (macOS) |
|---|---|---|
| On adjacent faces | Ctrl | Option |
| On all faces in the current context (for example, the same group or component) | Shift | Shift |
| On all connected faces | Ctrl+Shift | Option+Shift |
Note that all of these modifiers behave as toggles which will stay persistent until they’re toggled back off. For example, tap the Shift key to toggle the «On all Faces in the current context» functionality, perform your operations, then tap Shift again to toggle it back off.
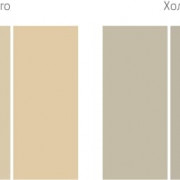
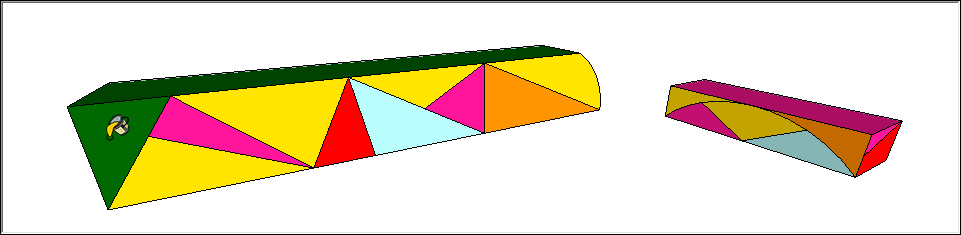
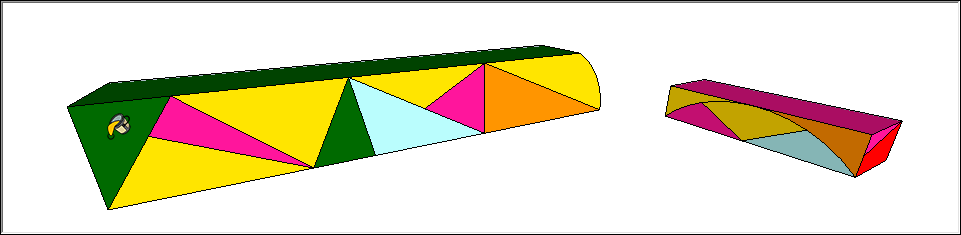
Here’s an example help you visualize how each shortcut works. Say you’re trying to figure out the colors for an abstract mural on two separate walls. The following figure shows the mural mocked up with materials from the Colors-Named collection.
To see how replacing the red with green might look, select the Paint Bucket tool and then select a green from the Materials panel (Microsoft Windows) or Colors panel (macOS). If you Ctrl- or Option-click the red triangle in the upper left, only the adjacent faces with the red material are replaced with green, as shown in the following figure.
If you Shift-click instead, all the red faces become green:

But if you Ctrl+Shift-click or Option+Shift-click, the red faces turn green only on the left wall:
Uninstalling or removing extensions
If you need to uninstall one or more extensions, the Extension Warehouse makes this task quick and easy:
- In SketchUp, select Extensions > Extension Warehouse and sign in to the Extension Warehouse.
- Select My Extensions from the user menu. The Extension Warehouse opens to the My Extensions tab.
-
You can uninstall all your extensions in one move by clicking Uninstall All in the top right of the My Extensions tab. Or, you might uninstall a single extension that you no longer use by clicking its Uninstall option.
Tip: When you uninstall an extension, it’s grayed out and moves to the bottom of the My Extensions tab, like the 3D Text Editor extension shown in the earlier figure. If you change your mind later, click Install to reinstall the extension. Or if you’re completely and totally done with the extension, click Remove to delete the extension from your My Extensions tab.
To uninstall an extension in the Extension Manager, follow these steps:
- Select Extensions > Extension Manager. The Extension Manager window appears.
- Click the Manage tab at the top.
- On the Home tab, click the Uninstall button next to the extension that you want to uninstall. After a few moments, your extension is removed from your copy of SketchUp. If you ever want to reinstall the extension, you can quickly access the extension on your My Extensions page in the Extension Warehouse.